Wednesday, September 23, 2009

My last Hurrah

The Italian Plums were ripe and we are leaving for Paris this afternoon.


It is my first crop of plums from our young tree, I couldn't let them go to waste. The Pflaumenmuss baked all night, now in glasses and labels affixed early this morning.


There is a certain fig tree in a vineyard, between Florence and Sienna, a perfect shelter for a picnic and the figs, the perfect dessert.

Ciao

Gina

Sunday, September 20, 2009

Going back


This little hand painted bag holds a Treasure


This little, hand painted muslin bag holds a treasure. A treasure I snatched from across the ocean 36 years ago. Now it is going back. But first I will show it Paris and then I will let it smell the salty sea of the Baltic. And then, and only then will I take it back to its home, Lake Maggiore, Italy.

Next summer, when it is in full bloom, will it know that this was its original place? Will it stretch its charming little face toward the sun and sway in the familiar breeze? Will it greet the strangers strolling by?

Of course, I am the one who will take it back. I am the one who snatched it away in the first place. And I am the one who painted the little muslin bag so it would have a proper presentation upon arrival.

And after I have completed my mission, I will go back, to my home, to my little Italy in Spring City, Utah.

Buon Viaggio

Gina


Friday, September 18, 2009

Verdigris

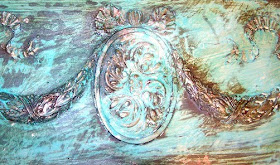
Verdigris Finish on a Lincrusta Frieze
Lincrusta is a textured wall covering similar to Linoleum
The same piece as above without special paint finish


two resin-based putti one faux finished in wood and one faux finished in Verdigris


A left-over piece of Lincrusta used as an Architectural Element

When certain metals are exposed to the air they acquire a patina known as Verdigris. From the Greek vert-de-Grece, from the old French verte-grez. The color of Verdigris was used in many Italian paintings of the 16th century.
There are many ways to obtain the green pigment. One of my favorite historic methods was the scraping of Italian church bells.
You can paint an ordinary object and transform it into something very special by giving it a patina. It is the paint treatment that sometimes makes the difference in price. Many surfaces can be verdigried; plastic, wood, ceramic, metal, etc.

The Lincrusta frieze above, was treated with a simple 2-step process. A kit available at most craft stores. It consists of a base paint which contains copper and a clear water-like liquid. Let the first coat dry and then apply as many coats of the clear acid as necessary. The process continues working for several hours.
If you are doing a large project the traditional method is less expensive: painted with oil-based paints, 3 different colors plus bronzing powders.
With very old brush apply dark green (almost black), then cover only some areas with medium green, then very light aqua green, let dry in between coats. Last coat, bronzing powders mixed with laquer to highlight.

Gina


Tuesday, September 15, 2009

Lavender Bottles


It rained and rained last night, and filled the house with the beautiful scent of drying Lavender


A Lavender Bottle


A gentle squeeze refreshes the scent


A hand painted sachet makes a welcome gift

Wear a few lavender sprigs under your hat and the headache disappears, tuck it under your pillow for a restful sleep, in your drawer it repells moths.

Did you know that lavender was the gayest color that the Quakers were allowed to wear?

The name is derived from the Latin "lavare" to wash, hence lavenderess, a washerwoman.

Varieties such as Hidcote, Munstead and Grappen all have long stems, required for making lavender bottles. If you don't have freshly picked lavender, soaking stems overnight in luke warm water will also work.

Gather an even number of stalks (about 20 will do) and tie a string just below the flower heads. Now, carefully, bend the stems backward and over the flower heads making a "cage". Tie loosely with another string at the bottom. Weave a pretty ribbon through the stems, starting in the middle of the cage and finishing to either end. Remove strings and tie a bow with the remaining ribbon.

The first lavender bottle will take about half an hour to complete. The next will be much easier.

Gina


Sunday, September 13, 2009

Artist Studio Tour and Charolais Bull Charge

Once a year, we have a great event in our little farming/artist community. A 3-day en plein air competition takes place. In addition, visitors are invited to the many artist studios we have in Spring City. Every year more and more people come from the big city and the surrounding communities.
Many people came to my Art Sale. We studied Palladio's villas in Italy. Always, Palladio designed a center hallway with rooms open to either side. We were told that we were wasting too much space. This hallway has had many functions. A dinner for 40, an artist reception, a wedding and much more. Yesterday it was a gathering place for my "Artist Studio Tour."


(This is only one small table)


One gentlemen liked all of my rustic plates


He purchased every one of them

That same evening all artists enjoyed a fabulous Dutch Oven Dinner at the Anderson Barn. The Andersons have restored a fine old homestead including a very special stone barn. Often we get together to celebrate in this great structure.
Everything was fine until we returned home. The huge Charolais Bull was out of the pasture. He was happy with the tall alfalfa but unhappy because he was separated from his ladies.


A rodeo ensued. It was too frightening to take a picture so I am borrowing this one from the State University of Oklahoma.

We were able to get the bull back into the pasture, but then he realized where he was. He went for our truck. He was furious. This guy is huge! By racing the truck through the pasture, in a zig zag fashion, we avoided his charging, massive body. Now, he became confused. He headed for the biggest tree near the fence line and totally demolished the tree. In the meantime, we opened a causeway to another pasture. The cows knew the signal and the bull followed still attacking everything in his way.
Something needs to be done with this big guy. Our farmer friend tells us that the bull needs a new zipcode.

Gina


Thursday, September 10, 2009

Fresco Art, How To


In a hallway of the Castello Estense, in Ferrara, Italy, you can admire a fresco in close quarters.
What a surprise! Except for the image, the fresco had the same texture and appearance as those that I have painted and have shared with my students at our local college workshops.


Close-up of my Fresco Technique


Location of Fresco ... stairs to the Cellar

The Swag

The Secret is the Sand, it gives it the "Fresco Look"


Here is how:
Same recipe as in an earlier post for Stone Walls.
12 cups of 35 grit builders sand to one box of dry wall compound.
(Sand is essential, prevents fresco from cracking)
Apply in broad strokes (not in circles) with 6 inch trowel
Let dry and paint image with acrylic paints
Here comes the hard part: you have to cover part of your art work with a thin layer of mud (dry wall compound with sand) again using a trowel. Let dry.
Wet an ordinary kitchen sponge (one that has a scrubber on one side) and scrub across the part you want to reveal or bring out. Soon you will accumulate some of the sand on your sponge. That is good because it helps remove some of the paint and some of the base. Let dry.
Last layer. Mix dark beer with colorant (artist guache or Universal tints) and with large soft brush cover entire surface. Use colors such as burnt umber and burnt sienna for an antique finish.
Admire your masterpiece
Gina

Wednesday, September 9, 2009

Worlds Apart


Gleaning the Fields and Artist Studio Tour.
Growing up in East Germany, food was hard to come by. I lived in a small farming community, as I do now, only now, Worlds Apart.


As a very young girl I would offer my services to farmers. It was usually a job that involved food of one kind or another. In the winter I would cut up hot fatty pigs meat into little squares to be used for sausages. In the summer I thinned rows upon rows of sugar beets. My pay; a sandwich and a cup of hot beef broth.


I don't know how my mother always knew when certain fields were being harvested. We were allowed to Glean the Fields. We gleaned what the machines left behind. That could be potatoes, beets and all sorts of grains.


To this day I can not ignore an unclaimed fruit tree that is laden with fruit. And now my own orchard has matured. That means that a lot of canning takes place in my kitchen in September.


Speaking of my kitchen, that is also where I paint my ceramics. That is where my "Artist Studio" is located. In a corner, by a large window, where I can see my pond, where I can keep an eye on my cooking and baking and where I can do my laundry.


Every September visitors from the 'big city" come to the "Artist Studio Tour" event. Many artists reside in our little town of 500 residents. My "Studio" is also open to visitors.


Besides selling my ceramics, I have also been asked to sell my canned goods, which is a good thing because I have been way too busy in my kitchen. My customers tell me that it is the labels. The images are from my painted ceramics, they make colorful and unusual labels.


A year later, they come back for the ceramics, the labels and what is in the jars.


My kitchen. Way in the back, by the large window, is my "Artist Studio"

Gina


Tuesday, September 8, 2009

The Process

It begins with an Idea


The idea takes shape. Pencil lines will disappear during firing process


Lines in manganese are painted with fine brush. Color pigments are added


A different plate. The painting is finished and bowl is ready to be glazed

All pieces are glazed and ready for the kiln


Finished and perfect
Gina

Sunday, September 6, 2009

Tussie - Mussie

A little nosegay of flowers and herbs

Their perfume was believed to cleanse the air. Ladies of the 18th century pinned them to the sleeves or the hem of their dresses. They last a long time and make wonderful gifts. They can be made from dried or fresh flowers. The classic Tussie-Mussie always has a rose in the center.

At this time of year you might want to encircle the rose with leaves of sage. Let the entire bouquet dry and the sage will be ready for your Thanksgiving Turkey dressing.

Gina

Saturday, September 5, 2009

Mud also known as Dry Wall Compound


There are many wonderful finishes that you can achieve with dry wall compound.

One of my favorite finishes is a 3-dimensional Stone Wall


To a box of mud (dry wall compound) add 12 large cups of builders sand (35 grit)

Mix well

Apply to wall with trowel in broad strokes. While still wet, dip a 3 foot long two by four into water. Score stone outlines into wet mud with two by four on edge. For verticals use smaller two by four.

Let dry
Dilute taupe or sandstone colored water based paint (6 to 1), brush onto entire surface.

Paint ordinary kitchen sponge with several colors of water based paint (do not dip sponge into paint)

Lightly press sponge onto each stone block in colors which you might find in nature.

Gina

P. S. For inside walls only


Friday, September 4, 2009

Primula Auricula


Full-on drop dead gorgeous

Auriculas growing in my greenhouse

Auriculas came to England with Hugenot Weavers when they were forced to flee France in the 16th century. The Primula was part of the flower collecting craze in the 17th century. Not to the same level as Tulipmania, where a Tulip bulb could cost as much as a house. Tulip bulbs were hung from the ceiling, in wire cages and also planted in wire cages so that rodents could not destroy them.
Auriculas are a species of Primrose, native to central Europe. I have not been successful in growing them from seed. However, there are several growers in the United States who will ship young plants.
Auriculas make their appearance in many fabrics, especially French and English chintzes, Meissen Porcelain and many Botanical Drawings.
Gina

Thursday, September 3, 2009

It's time to make Sauerkraut


The Germans did not invent Sauerkraut. Chinese Laborers 2,000 years ago, building the Great Wall of China, ate Sauerkraut to prevent scurvy.


Gene making Sauerkraut

Cabbage was initially fermented in rice vinegar. I use my mother's recipe of sprinkling coarse salt, mustard and caraway seeds between layers of shredded cabbage and letting it ferment naturally.

My secret is using a mild cabbage called Zuckerhut or Spitzenkraut (pictured above).

Quarter cabbage, remove small core, shred.

Place about 3 inches of shredded cabbage into large stone crock.

Sprinkle with handful of coarse salt and about 1 TB of caraway seeds and 1 TB of mustard seeds.

Repeat layers until stone crock is filled to within 3 inches of top.

Invert large plate on top of kraut and place heavy weight on top of plate.


Cover with cloth.

Check in a day or two to make sure liquids have come to the top or add a little water to cover kraut.

Let ferment for six weeks in a cool (about 60 degrees), dark place.
Freeze in serving size bags.

Gina

Tuesday, September 1, 2009

Asters from Lake Maggiore


Strolling along a side walk, Lake Maggiore, Italy, beautiful Asters were growing through a fence. I am an expert seed collector. Knowing when to harvest them is part of the success in growing them. These Asters were ready.

They were growing through the fence, right along my path. I picked one seed head of each color. Looking up toward the house I noticed a young woman watching me. I smiled and waved, she smiled and waved. She knew what I was doing and she didn't mind.

Little did she know that her Asters were going to America. That was 36 years ago. Lake Maggiore Asters are growing in the gardens of my friends and in mine.
Gina

Painting Lessons

Every now and then I teach a workshop in Maiolica Painting. And, every now and then I teach an individual. I am always amazed at the final outcome of the product.


This table top, in the antique style, was painted by my student of last week. She has not had much experience in ceramic painting and look at the fine job she did.

We use Italian pigments and Italian Glazes. No wonder they look as if they were purchased in Italy - - - for a fraction of the price you can paint your own. And, you don't have to have them shipped nor do you have to schlepp them all over Europe.

Painting ceramics is not difficult. I have had all sorts of students, an electrician, an 8-year-old little girl, a family doctor, a school administrator, an architect, several Interior Designers, etc. , etc.; and groups of friends who like to get together and just paint for a few days. Without exception, they are always surprised at the beautiful outcome of their newly acquired skills.

It happens in the kiln. When the colors and glazes fuse together, at 1800 degrees, the magic happens.

Gina