
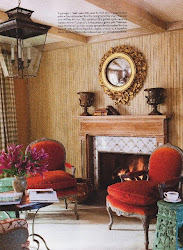
There was a design problem... I needed to fill the spaces above 2 windows.

All of my windows, on the main floor, are very large French windows. However, the front facade windows are much smaller. Window treatments can look very awkward if placed at different heights in the same room. But now what should I do with the empty space? A Trumeau will do the trick.

What you will need is a sturdy wooden board, not very thick. Cut it to the appropriate size to fit your space. Cover board with dry wall compound (add little builders sand), see earlier posts about frescoes. With screws attach garland and shell motif or something similar. I found these at TJ Max. They were hideous, gold resin architectural fragments. With an old brush apply more dry wall compound onto resin pieces and fill any open spaces. Let dry. Cut a stencil from mylar film and push dry wall compound through stencil to make frame. Or you can add a more conventional frame to your masterpiece. Let dry again. Mix a few acrylic paints with beer or water and brush helter skelter over entire surface. Last coat, age the piece a little by adding a warm brown color mixed with beer or water.

See the space above the left window? So forlorn looking.
 So much better
So much better
Now, this is the way I like it.
Gina


Yes, it looks better. I don't know half of the materials you used. The US must be a paradise for people interested in any DIY and crafting. I specially like how you did the frame, and wish I could get hold of mylar film etc and make my own picture frame!
ReplyDeleteHi Francesca, Dry wall compound is available in Italy. It is the stuff that is used in the first stages of building a wall and after dry wall boards have been taped. It is then sanded for a smooth wall finish.
ReplyDeleteMylar is similar to the plastic used for stencils. You might be able to find a stencil that is suitable for a frame design. You have to work it in sections as most designs don't come long enough for the project. Just push the dry wall compound through the stencil with a trowel. Then, carefully, remove the stencil. This time you do not mix compound with sand. Just use it out of the box. Let dry and then paint or gild.
Most of the ideas I write about in my blog I have dreamed up at 2:30 in the morning. A great time to come up with new ideas. Not everything, however, has been a success story.
Gina
What a great idea as a space filler :) And I figure things out in the middle of the night, too!!! Best time to solve design problems - perhaps because all the cares of the day are put away and the mind is more clear to solve those little design issues!!!
ReplyDeleteHi Barbara, great to hear from you. Snow is trying to melt a little, soon we can think about painting ceramics.
ReplyDeleteGina
clever girl! I have done similar things...always start with jc to solve a problem! LOL!
ReplyDeletegorgeous!!!!! love this! I have wanted to try this technique, and this is a fabulous way to do it. Thanks so much for sharing this at Transformations and Treasures!
ReplyDeleteDear Theresa, Isn't it amazing what one can do with joint compound.
ReplyDeleteHi Denise, When you try this let us see a picture.
ReplyDeleteWhat wonderful ideas..thanks for sharing you are a very talented lady Vonda Jessup
ReplyDelete